Changing a DNS (Domain Name System) server might seem like a routine task, but it can profoundly affect network performance, security, and reliability. If not configured correctly, it can lead to slower connections, security vulnerabilities, or even complete network outages. To that end, understanding how to change a DNS server properly is paramount for IT professionals.
In this blog, we’ll explore why changing a DNS server matters, provide step-by-step instructions for common systems, and address potential troubleshooting challenges to ensure enhanced security, improved website speed, and more.
Why You Need to Know How to Change a DNS Server
DNS is a foundational component of any network, serving as a “phonebook” of sorts that translates human-friendly domain names (like examplewebsite.com) into IP addresses. This enables users to access websites and online services without needing to remember complex numerical addresses.
However, there are a few scenarios when you might need to change a DNS server:
- Improving Network Performance: Switching to a faster or more geographically localized DNS server can reduce latency and improve load times for users.
- Enhancing Security: DNS providers like Cloudflare and Quad9 offer security-focused DNS services that block malicious domains, protecting users from phishing and malware.
- Preventing DNS Highjackers: As mentioned above, properly changing a DNS server has significant security benefits, such as preventing hackers from forging DNS records that send users to fake websites designed to steal information from them.
- Troubleshooting Issues: Sometimes, DNS misconfigurations or outages can cause connectivity problems. Changing the DNS server can be a quick way to isolate and resolve these issues.
- Customizing Network Behavior: Your organization might use private or custom DNS servers to control access to certain websites, enforce content filtering, or manage internal network resources.
- Managing Client Networks: For MSPs, configuring and optimizing DNS settings is a crucial part of maintaining reliable and secure networks for clients.
Regardless of whether you’re optimizing a network for performance, implementing a security policy, or addressing connectivity problems, understanding how to change a DNS server is a skill that you will undoubtedly need throughout your career as an IT practitioner.
How to Change a DNS Server: Step-by-Step Instructions
In the event that you or your client need to change your DNS server settings, follow the steps detailed below that align with the correct operating system.
Changing DNS Settings on Windows 10/11
- Open Network Settings:
- Right-click on the network icon in the system tray and select Network & Internet Settings.
- Click on Change adapter options under the “Advanced network settings” section.
- Note: This is different depending on your version of Windows. For instance, in Windows 11, go to Network & Internet Settings > Advanced Network Settings > Choose my network Adapter > More Adapter Options > Edit Button.
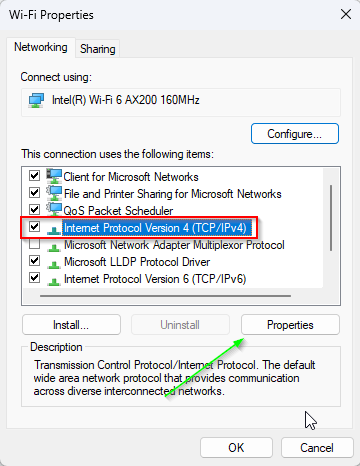
- Access the Network Adapter Properties:
- Right-click on your active network connection and select Properties.
- Highlight Internet Protocol Version 4 (TCP/IPv4) and click Properties.
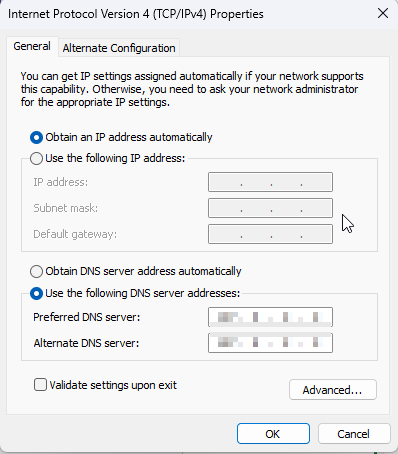
- Update the DNS Server Addresses:
- Select Use the following DNS server addresses.
- Enter the preferred DNS server (e.g., 1.1.1.1 for Cloudflare) and an alternate DNS server (e.g., 8.8.8.8 for Google DNS).
- Click OK to save the changes.
- Verify the Changes:
- Open a command prompt and run the command: ipconfig /all. Look for the DNS server entries to confirm they match your updates.
Changing DNS Settings on macOS
- Open Network Preferences:
- Go to System Preferences > Network.
- Select your active network connection and click Advanced.
- Update DNS Server Addresses:
- Navigate to the DNS tab.
- Click the + button to add new DNS servers (e.g., 9.9.9.9 for Quad9).
- Use the – button to remove old or unwanted DNS servers.
- Save and Apply:
- Click OK and then Apply to confirm the changes.
- Test the Configuration:
- Use the terminal to ping a website (e.g., ping example.com) to verify proper resolution.
Changing DNS Settings on a Router
- Access Router Settings:
- Log in to your router’s admin interface, typically accessible via a browser at 192.168.1.1 or 192.168.0.1.
- Locate the DNS Settings:
- Look for the DNS configuration under WAN, LAN, or DHCP settings (the location varies by router model).
- Update the DNS Servers:
- Enter the new DNS server addresses (e.g., 208.67.222.222 for OpenDNS).
- Save the configuration and restart the router if necessary.
- Verify the Setup:
- Use a device on the network to check if the new DNS settings are applied, often visible in the device’s network properties.
Troubleshooting Common DNS Change Issues
Changing a DNS server is usually straightforward, but as an IT admin, you know that nothing is without its challenges or issues. Here are some common problems you may encounter during the process, and how to address them:
- No Internet Connection After Changing DNS:
- Possible Cause: Incorrect DNS server addresses or incompatible settings.
- Solution: Double-check the entered DNS addresses and ensure they are valid and reachable.
- Slow or Unresponsive DNS Resolution:
- Possible Cause: The chosen DNS server may be experiencing high load or is geographically distant.
- Solution: Test alternative DNS servers to find one with better performance in your region.
- Changes Not Taking Effect:
- Possible Cause: Cached DNS entries or a misconfigured network adapter.
- Solution: Flush the DNS cache using the command ipconfig /flushdns (Windows) or sudo killall -HUP mDNSResponder (macOS). Restart your device if necessary.
- Router Ignoring Custom DNS Settings:
- Possible Cause: ISP-enforced DNS settings or incorrect router configuration.
- Solution: Check if your ISP forces DNS settings and consider setting up DNS at the device level as a workaround.
Pro-Tips
- Public DNS Providers: Popular options include Google DNS (8.8.8.8), Cloudflare DNS (1.1.1.1), OpenDNS (208.67.222.222), and Quad9 (9.9.9.9). Each provider has unique features, such as enhanced security or privacy.
- DNS Over HTTPS (DoH): Modern DNS providers often support encrypted DNS queries, which enhance privacy and security by preventing third parties from snooping on DNS traffic.
- DNS Benchmarks: Tools like GRC’s DNS Benchmark or Namebench can help you identify the fastest DNS server for your location.
- IPv6 DNS Servers: As networks increasingly adopt IPv6, ensure compatibility by using IPv6 DNS addresses when applicable.
Final Thoughts on DNS
Despite the critical importance of understanding how to configure DNS settings, it remains an oft-overlooked aspect of technology infrastructure. Why? Some may underestimate its complexity and importance in network configurations, while others may focus on other strategic IT initiatives like implementing security policies. I’m sure there are a hundred reasons why it might get sidelined, but the simple reality is that understanding and implementing proper DNS configuration needs to be prioritized – full stop.
Doing so will significantly improve network reliability, user experience, and much more. By following the steps outlined above, you’ll be well-equipped to handle any DNS-related challenges that come your way.

Share
Related Resources